Using FTP client to upload files to a Domain Hosted by Marshallnet
1. Download a FTP program, for these tutorials I will be using FTP Commander 7.2 (Free)
Click here to Download Free Copy of FTP Commander 7.2
Click here to Download Trial Version of WS_FTP
Click here to Download Trial Version of Cute FTP
2. After the FTP commander is installed, click on start, programs, FTP Commander.
3. Now we have to create a new server so you can log into your Domain.
4. Click on New Server 
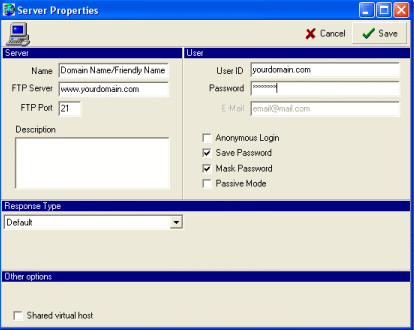
5. For the Name type in a friendly name that you want to call your Domain such as Your Domain. Please refer to the screen shot below
6. For the FTP server (FTP Commander 7.2) or Host Name (Cute FTP) type www.yourdomain.com
7. For username type yourdomain.com.
8. For password type in the password that you selected when you set up your Domain Hosting account.
9. Then click save 

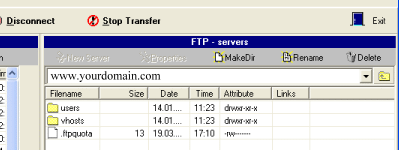
10. Now you should see your Server Name listed in the right pane. Double click the server name which is the frindly name that you typed in step 5 (Your Domain).
11. If you are logged in sucessfully you will see a folder called users and vhost and a file called .ftpquota.

12. Double click on the vhosts folder, then double click on the www folder, then double click on the htdocs folder. This is where you will upload all your html files and pictures (all html & pictures should be in the htdocs folder).
13. To upload a file, browse to the location of your html files, the left pane shows your local hard drive. Select the file you want to upload and click the red arrow  pointing to the right pane. pointing to the right pane.
14. To view your webpage open up your web browser (Internet Explorer, Netscape, Opera) and type in the following address www.yourdomain.com (where yourdomain is replaced by the domain name you registered).
Using FTP client to upload files to Marshallnet Personal Webspace
1. Download a FTP program, for these tutorials I will be using FTP Commander 7.2 (Free)
Click here to Download Free Copy of FTP Commander 7.2
Click here to Download Trial Version of WS_FTP
Click here to Download Trial Version of Cute FTP
2. After the FTP commander is installed, click on start, programs, FTP Commander.
3. Now we have to create a new server so you can log into your personal webspace.
4. Click on New Server 
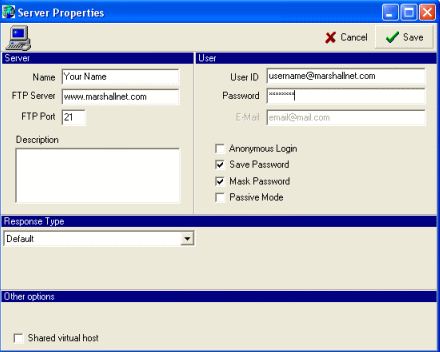
5. For the Name type in a friendly name that you want to call your webspace such as Someone's Personal Webspace. Please refer to the screen shot below
6. For the FTP server (FTP Commander 7.2) or Host Name (Cute FTP) type www.marshallnet.com
7. For username type your marshallnet username in this format username@marshallnet.com (same as dialup username).
8. For password type in the password that you selected when you set up your Marshallnet account (same as dialup password).
9. Then click save 

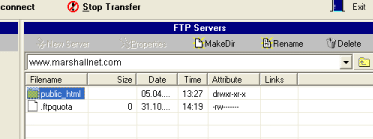
10. Now you should see your Server Name listed in the right pane. Double click the server name which is the frindly name that you typed in step 5 (Someone's Personal Webspace).
11. If you are logged in sucessfully you will see a folder called public_html and a file called .ftpquota.

12. Double click on the public_html folder. This is where you will upload all your html files and pictures (all html & pictures should be in the public_html folder).
13. To upload a file, browse to the location of your html files, the left pane shows your local hard drive. Select the file you want to upload and click the red arrow  pointing to the right pane. pointing to the right pane.
14. To view your webpage open up your web browser (Internet Explorer, Netscape, Opera) and type in the following address www.marshallnet.com/~username (where username is replaced by the first part of your marshallnet email address).
 Back to Support Home Back to Support Home
|
FTP/Host server (Personal): www.marshallnet.com
FTP/Host server (Domain): www.yourdomain.com
|
|
|

